Slider

Grace Adele Handbags and Giveaway

Thursday, August 30, 2012


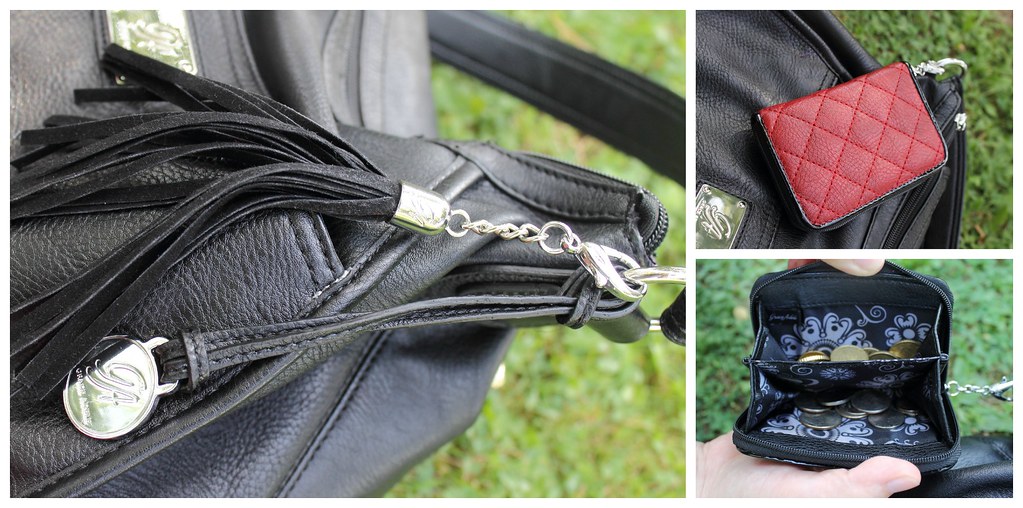
My friend Chelsea is a Scensty consultant and she has a real treat for one lucky reader.   But before I get into the giveaway I want to introduce you to one of the products from brand released by Scentsy called Grace Adele.   This is a line of high quality and really cute bags, clutches, wallets, jewelry and accessories.  This is the Lily bag that she built for herself with the Leigh clutch.

The great thing about Grace Adele is that you can easily customize your bag, clutch, and accessories to create a flawless style all your own!  My favorite part about the bag is the clutch that first perfectly in the bag.

But can easily be removed and worn separately as a clutch.

The bags come with accesories like the tassles and a matching coin purse. 

It is the perfect size being big enough to carry everything but not too big that I feel like I have the whole house with me. I love that it has tons of pockets and comparments to keep you organized.  It even has this zipper pocket on the side that would be a great place for keys and a cell phone.

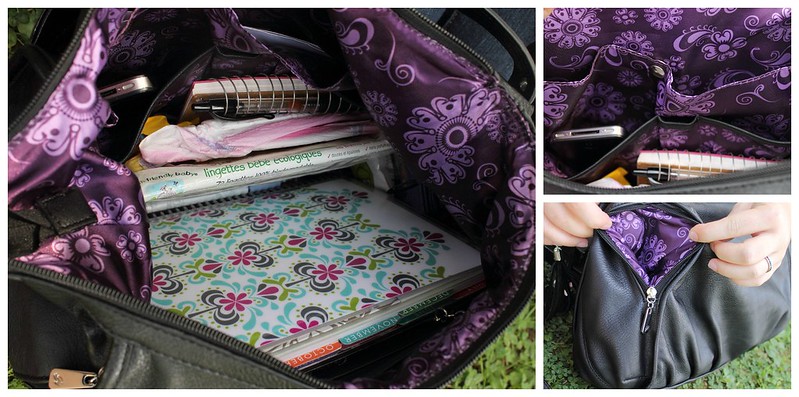
If you are building a bag you can even include matching accessories.

And now for the giveaway.

  Chelsea has been generous enough to offer a $25 gift certificate for Grace Adele to one lucky reader.  All you have to do is visit her site HERE and leave a comment letting me know what your favorite bag is.  Don't forget to include your email so I know how to reach you. 
The giveaway ends Septemeber 6, 2012. 
a Rafflecopter giveaway

If you are interested in Scentsy or hosting a party just contact Chelsea at cshmahoney@gmail.com.  Good luck!

How to Make Chalkboard Labels

Wednesday, August 29, 2012

The other day I was at the craft store looking for nothing in particular when I saw some chalkboard paint.  It sells out pretty fast considering our store is tiny so I bought some not knowing what to do with it.

Well, that didn't last long and now I am in love with chalkboard paint and have already used it on some projects.  I wish they sold the spray paint version so I could try it.  Anywhoo, these labels are so easy to make and would be perfect for so many thing!  Labels for party drinks, the dry food jars in the kitchen, serving trays, and the list goes on.  I used mine for our craft jars [which use to be old spaghetti and sauce jars].

Sidewalk Paint Recipe

Monday, August 27, 2012

I have been thinking about what to focus my "me" time to and as you can see my main focus will be on planning crafty projects for the little one.  I am still going to do a little of what I love but you will soon be seeing an overload of kiddy stuff.

And with that said, I saw this on pinterest and had to try it.  It was a huge hit with Cindy.  When she sees our back patio she asks to paint.  I have to admit I enjoyed it too! 

It is really easy to make.  One cup of corn starch and one cup of water.  I added a little more cornstarch to make it thicker.  I store mine in a tupperware and when we want to paint I just stir it and pour. 

I poured it into a cupcake pan and we mixed in the food coloring.  It was cute to see her a little amazed to see the colors come to life. 
We headed out and spent almost an hour sitting there and just painting.   I poured water into the empty cups and she enjoyed swirling the colors into the water and seeing the water change.  Oh the simple things in life.
My favorite part is that I am only one big bucket away from cleanup.   Love it!

Tutorial: Sewing a Lining into the Bag

Saturday, August 25, 2012

Remeber the ABC tote that I recently made?  Well, I am not a fan of raw edges so I decided to sew a lining into it.  I think it just looks so much nicer this way. 

This will be an extension of the Tote Tutorial.   Along with cutting out two squares of canvas, you will also cut identical squares for the lining.  I had tons of this orange so I used this and I really like how it looks with this fun kiddy tote.  If you want to add pockets, now is the time to do so.

Sew down and around the back following the arrows leaving a small opening at the bottom.

Sponge Painting

Thursday, August 23, 2012

Part of getting prepped for Cindy's upcoming "preschool" is loading up on tons and tons of fun activities.  She loves to paint and color and I mean loves.  She asks me every day if she can paint.   And if you are wondering why she has all that paint on her chest it is because she kept signing more paint please. 

Sign language and finger painting doesn't mix.  When she says colors, she ends up getting a mouth full of paint.  Needless to say, painting usually ends up with lots of clean up.

 Anywhoo, I just ordered some alphabet sponges and thought I could probably make my own shape sponges.  I bought some cheap dollar sponges....

Freezer Paper Stencil on Fabric

Monday, August 20, 2012

I have a new crafting love and it is a shame that I have not used it sooner!  I am a lover of freezer paper and from now onto the next few weeks you will be hearing me gab on and on about it.  First, I love it because it makes the best stencil for painting on fabric.  You can't beat the price, a giant roll of this good stuff for less than three bucks!  The best three bucks I have spent.
 

I couldn't help myself, I had to make another tote.  But this one serves a specific purpose.  I am working on a curriculum for Cindy for when she turns two.  A sort of formal home preschool for her, but I didn't want to wait six more months to start prepping because it is a ton of work.  This ABC 123 bag is part of that curriculum [I will share more on that later].  Freezer paper is going to be my handy helper in lots of the upcoming projects so jump on the band wagon and get a roll.


I first printed out the letters I wanted to print onto the bag.  You can download this bubble font HERE.   I printed it in gray so that I wouldn't waste all my black ink. 

Then, I took some freezer paper and traced the letter onto it.

Use an exacto knife to cut it out.  It seriously only takes a few minutes to do. 

Place the stencil onto the bag and ironed it on.  Make sure all of it is down and sticking to the bag and the platicy portion is on the bottom.  Then, paint with fabric paint!  Yup, that simple. 

Once the paint dries, you can peel the freezer paper and TADA you have a printed design.  It is super easy and you can really get creative with your designs.  I thought mine was too boring so I created a border around the letters by punching holes in the freezer paper and ironing it on. 
I am in freezer paper heaven.

Tutorial: Painted Toddler Tote

Thursday, August 16, 2012

 I am tote crazy because I want to make tons of these little cuties!  It is super easy and isn't it darling?  It's the perfect library book bag.  [Be sure to read the entire tutorial once before actually starting.]

Her First Tote

Along with shoes, Cindy loves bags.  She got this adorable back pack for her birthday and every so often she puts the straps around her neck and carries it all around the house.  It is adorable and looks pretty funny.  She will pretty much carry anything with a strap.  Because she loves bags, I wanted to make a special one just for her. 

At first I thought about making something really fun and intricate.... ruffles, pockets, and the whole sha bam but then I saw a bunch of these simple summer totes and I knew it was perfect.  I figure I would save the fancy purse for when she is a little bit older so I can fill it with tons of Fancy Nancy things.  I do love this little tote and if you want to make one HERE is the tutorial.

The Honeymoon is Over

Wednesday, August 15, 2012

I am getting close to the three month mark on my Fit for Life goal and it has been an up and down battle.   After the last time I chatted with you all about it, I was doing really well.  I was hitting my goals, feeling motivated, and yup even going running almost every day.  I could actually see a change in my body.  I would coin it the honeymoon phase.

My relationship with working out is like marriage.  When you first date or get married it is all peaches and cream.  For one,  you just want to be around each other all the time, everything is easy, you don't fight and it is perfect.  That was the first few weeks of working out.  I was pumped, I wanted to work out all the time, and it was perfect. 

And then... I hit a bump in the road.  And just like in any relationship, the bump will either make you or break you.  Last week life got the best of me and I was sooo busy and exhausted I hardly worked out.  I lost all the momentum I had built over the last few weeks and it was a bummer.  I went on a run on Monday and it felt terrible.  Why is it so hard to get to one point but so easy to fall back to the beginning? 

It has been a little discouraging, but I have decided to fight on and try to build the fire and motivation that gets me to put on my workout shorts in the morning.  I needed some quick encouragement and a boost in my confidence.  For me, that is getting on the treadmill.  It is so much easier to run on this that pushing a stroller on the trail.  And Cindy didn't mind either because she got to play.  

So, if you have set a workout goal with me and you are struggling, get back up and find a quick encouragement.  Don't let that bump in the road ruin your relationship with excercise. 

Vintage Bridal Shower Tea Party

Tuesday, August 14, 2012

Awhile ago I did some paper crafts for my cousin who was going to host a Bridal Shower with a theme that I love... a vintage tea party!  She is amazing at party planning.  She help start a company that does candy buffets and they have such a gift for putting things together.   Check out their Facebook page at Sweet Boutique Candy Buffet.  I know first hand how awesome the candy buffets are because Cindy had one for her first birthday.

Anywhoo, I love tea parties and I forsee a tea party for one of Cindy's birthdays in the future.  The one she hosted came out so darn cute that I just had to share.  Lets first start at the guest book table.
I just love it!  A tea pot, lace overlay for the table, pens in a tea cup, and a personal touch with the bride and groom's picture.  And what a great idea to put the instructions for the guest book in an Ikea frame.  Those Tolsby frames are 99 cents and can be spray painted any color! 

The two small parts I helped out with were the banner and guest book page. 
I imitated a guest book page she found on another site.  You can download a blank copy HERE.  The font I used for the name was Jane Austen and you can find instructions on how to insert the name at the very end of THIS post. 

Now, onto the rest of the party.  My favorite part would have to be the centerpieces on the table!  LOVE it.  I don't know where she found that bird tin but I want to steal it.  Hydrangeas are my fave and I think the stacked tea cups are very clever.  The mason jars with the lemon slices add the final perfect touch.

What caught my attention from the candy table was the old glass window that they wrote on.  Such a cute little piece to give it that vintage feel.  I myself also love cupcakes accompanied by a small cake.  I did that at Cindy's party.  It is just easier to serve, cheaper, and those cupcake stands are also pretty inexpensive.

And a party isn't a party without paper pom poms.  I have a tutorial for those HERE.  You can see some details from the candy buffet below.  I just love the personal touches included in the party decor with the couple's engagement picture between the cookies. 

My cousin never ceases to amaze me at how she puts together these parties.  After seeing this, planning a kids tea party is for sure in my future.

Recipe: Easy Lemon Cookies

Friday, August 10, 2012

I am seriously having the craziest week of my life... okay so a bit of an exaggeration but me oh my!  I can't remember the last time I was this busy or tired.  I don't know how I lived like this when I was in college.  Can't wait until next week when I can go back to living the slow life again.  This week was tough and full of lemons.

And you know what they say, when life gives you lemons.... make lemon cookies.  So, moving past the cheesy and onto the recipe.  I am sure there are amazing lemon cookie recipes out there but lets face it, some days I just don't have the time to cook from scratch.  These cookies are super fast, super easy, and still yum yum yum. Want to make some?
[Makes about 3 Dozen]

Ingredients:
1 package lemon cake mix
2 eggs
1/3 cup of vegetable oil
1 teaspoon lemon extract
lemon zest [optional]

1. Preheat the oven to 375 degrees. 
2.  Mix all the ingredients together.  I like to store it in the fridge for a little bit so it is easier to handle but that isn't necessary. 
3.  Drop teaspoons full onto a cookie sheet.
4. Bake for 6 to 9 minutes or until the bottoms are light brown.

Lions, Tigers, and Bears OH MY

Tuesday, August 7, 2012

After having such a long and bumpy last week, we decided to take a little family trip to the zoo.  Sometimes it's nice to just get away from the everyday and do something fun.  We took the train there and even though there was a little rain it was so much fun! 


It was Cindy's first time at the zoo and she had mixed feelings.  She showed all the emotions... She was in awe of some of the animals, while scared of others.  I can bet her favorite part was playing at the playground because she didn't want to leave the swings.  My favorite part of the trip was when we kept asking her do you see it? and finally she said I see I see.  Oh my goodness that is a memory I will keep with me forever.  It was hilarious.

My favorite animal the giraffes.  They were feeding them so they were in this room.  I have never seen them up close like that before but they were magnificent!  Wow!


I hope you all had a wonderful weekend as well!

Baby Clothes Quilt Pattern

I have grown to love Cindy's little baby clothes quilt even with all of it's imperfections.  It is so soft and cozy.  We play this game where I wrap her up like a little baby and rock her.  She loves it.   We love it and you can see more pictures of it here.  Even though it is my first quilt and pattern I thought I would share it anyways. 

I didn't do detailed step by step picture instructions because there were many whoopsies in the process.  I gave some basic instructions on how to put the pieces together.  It is very simple.  You can download the PDF version HERE.  I just searched for tutorials on how to baste and bind the quilt.  The tips I would give are to cut your squares and pieces precisely and iron out your seams.  I used a half inch seam allowance because it is easier to iron and use when sewing the onsies.

The Charm Bracelet from Bringing Up Girls

Monday, August 6, 2012

I just finished reading Bringing Up Girls written by Dr. Dobson and though I am a big fan of his, I thought the book was just A-ok.  It wasn't as good as I had anticipated it to be.  I liked how he emphasized the importance of a father in a little girl's life and the role a mom plays in molding her princess.  He gave some good practical advice, but it just wasn't as good as Bringing Up Boys.  I personally liked What a Difference a Daddy Makes better.


This isn't going to be a book review where I highlight my favorite quotes.  Instead, I am going to share a story he shared that resonated with me.  I was hesitant to share it because I don't want to offend anyone or make anyone feel bad.  Sharing my faith and what I believe in is something I struggle with but here goes...

The Charm Bracelet
Sweet 16 had finally come! I never thought I‘d make it. But I did. And it was amazing. My parents threw the birthday party of the century, and I had more people than I could count. The whole day had been awesome. But as I watched the sun begin to set, I knew the best part was soon to come. 


It was late in the evening. Confetti had been swept up, helium balloons had started to sag and gift wrap had been folded neatly and tucked away for my mum’s later use. As I sat at my window studying the dusky sky, Dad peeked into my room with a smile.

“Ready to go, Sweetie?” he asked.  Was that a trick question? I wondered as I scrambled to my feet. I’d been waiting for this night for five long years, and it was finally here! I was now officially allowed to date!  The plan was for my parents and me to go to my favorite restaurant on the night of my 16th birthday and officiate the agreement, go over standards and discuss rules and such. And now we were finally on our way.

I sat across from my parents in a quiet corner booth. Having just placed our orders, I figured it was time to get on with it. “So. I can go out with any guy I want to, right?” I squealed, hardly able to contain my excitement.  Mum and Dad chuckled. Dad answered, “Well, we agreed to that, didn’t we?”  “Sweet!” I exclaimed, doing a little victory dance in my seat. My parents had held me off for years, but now that the time had come, they would let me date any guy I wanted! Of course they knew I had a good relationship with God and wasn’t too short on common sense, either.

“Now wait just a second,” Mum interrupted with a smile. “You have to agree to a little something yourself.”  I was expecting a lecture of some sort, so I was already prepared. “So what do I have to do now?” I asked, leaning forward on my elbows.  “Just open this,” Dad answered, producing a small white box. He gave a mysterious smile.

One Little Rule… I hesitated a moment before untying the curly pink ribbon. I slowly opened the lid and saw a beautiful silver bracelet. But not just any bracelet. It was a charm bracelet. And they weren’t just any charms. They were gemstones, small but gorgeous. A dozen dainty charms dangled gently.

“Wow.” I didn’t know what else to say. I wasn’t expecting this at all.  “Now you have to understand this isn’t just any bracelet,” Mum informed me.  “I know,” I said. “It’s so beautiful!” I studied it closer. There were six small charms alternating with six tinier ones. The smaller ones were a deep blue. Sapphires, I guessed. And the other six were each different. One appeared to be just a rock, one was pink, a white one, a red one, green … and was that a diamond?

“This charm bracelet is symbolic,” Dad explained, leaning in closer to study it with me. “It represents you and your purity. This is what will guide you through your dating relationships. Your mother and I can only tell you what’s right. We can’t make you believe it yourself. Hopefully, this will.”  I looked up solemnly. “I’m listening.”

“This represents the first time you hold a guy’s hand,” Mum said, pointing to the gray one. “It’s just a piece of polished granite. Seemingly cheap, yes, but it’s still a part of your bracelet. This is pink quartz.” She gently rubbed the next one between her fingers. “It represents your first kiss.”  “This green one is an emerald,” Dad continued. “This is your first boyfriend. The pearl is the first time you say ‘I love you’ to a man other than me.”  

I giggled. This was so amazing.  “The ruby stands for your first engagement. And the diamond represents the first time you say ‘I do,’ ” Mum finished.  After letting it all sink in, I cleared my emotion-clogged throat. “What do the six tiny sapphires stand for?” I asked.  
“Those are to remind you how beautiful and valuable you are to us and to God,” Dad replied. “Now here’s the hitch in all this, the one and only rule you’ll ever have to follow when it comes to dating.”

Only one rule. Sounded good. But little did I know …“Whenever you give one these actions of love - a kiss, an ‘I love you,’ a hand to hold… you also have to give the recipient the gem to match.”  I must’ve misunderstood. “I have to give him the gem?”  “You have to give it to him,” Mum restated.

I was silent for a moment. I thought they must be joking. But they weren’t even thinking of cracking a smile.  “But Dad!” I suddenly shrieked. “These are insanely expensive! I can’t just give them away!”  He gave a soft, loving chuckle. “Did you hear what you just said?”  I thought about it.

“Baby, your purity, your heart, they’re far more valuable than a few little rocks. If you can’t find it in your heart to give away your little charms, I don’t think you should be giving away the things they represent.”  I could feel my insides melting, ready to gush out my tear ducts. On the one hand, it made me feel valuable and precious. But on the other, it made me furious. It made no sense. But it would…..

A few weeks after that night, I was hanging out with my friends at the beach. Chad wouldn’t swim because I wouldn’t swim…. I was more interested in reading than getting caked with sand, and he was more interested in sitting with me than swimming with his buddies. 
He was sweet. He was cute. And he tried to hold my hand.  I was thrilled for a small moment, when a certain piece of ugly granite flashed through my mind and made me move out of his reach… I was severely annoyed.. annoyed at my parents, annoyed at my bracelet-turned-handcuffs, but most of all, annoyed at myself. I was letting a little rock dominate my romantic life.

I furiously glared at it during the whole embarrassing walk to the showers and toilets.. But then God hit me upside the head with a shocking epiphany….I couldn’t give up my little chunk of granite. It was a part of my bracelet, which in a sense made it a part of me. I wouldn’t be whole without it. It wasn’t a priceless gem, yet it was still valuable. It made sense after that.  


Kevin came along eventually. We had fun. We hung out a lot. I thought I might love him. I thought I might tell him so. I thought of my pearl. It turned out that I didn’t love him as much as I thought I did.  So my parents had been right. They couldn’t make me believe the things they wanted me to believe. So they let God and my bracelet do the work instead.  Among the four of them, I figured out how valuable I was. How valuable my purity was. How not valuable guys were who just wasted my time and emotions. If they weren’t in it for the whole bracelet, why should they get one part of it?

Nate…. He thought my bracelet was awesome. So he never tried to hold my hand. He never tried to kiss me. But he asked me to marry him… I never knew that so many years of torture could amount to so much happiness. I’d thought it was silly. I’d thought it was overrated. But now, I‘ve never been more glad of anything in my life… As I gave my husband the charm bracelet in its entirety, I wondered why I had found it so hard to hang on to those little rocks when it was so amazing to give them all to the man I truly loved.

But it didn’t end there…. Now our daughter wears it.


I just love this story and even though I dread the day she asks to date, one day we will sit her down and give my little Boo her very own Charm Bracelet.  

DIY: Very Hungry Caterpillar Invitations

Friday, August 3, 2012

Even though this year we aren't planning a big party, I still can't help but think about Cindy's second birthday.  It seems that once I hit the 6 month mark my brain just starts storming.  I have been getting a lot of requests for The Very Hungry Caterpillar invites, this cutie in particular so here it is readers.  I am not sure if this is the one for us yet, but it is darling.

Recipe: Best Raspberry Smoothie

Thursday, August 2, 2012

I am having one of those weeks that I would like to forget.  It's been a tough one folks hence the lack of being online.  If you are having a tough week like me this smoothie is a guarantee picker upper.  I am not going to claim it is healthy because it isn't and that is why we usually have it for dessert.  Actually, it has a lot of sugar in it but we can overlook that because it is really good.  If you are a health nut, you might be able to find a nice sugar substitute.  Doesn't it look so yummy?!

One random day we were watching Giada and my hubby was so enticed with the smoothie and asked me to make one.  We surprisingly had all the ingredients so I whipped it up and now it is a family fave!  Thanks Giada!

So here is what you will need to make 4 servings:


1/2 cup of sugar
1/2 cup of water
1 cup of plain Greek yogurt
1 cup of frozen raspberries
1/2 cup of apple juice
2 cups of ice
1 tsp of vanilla [optional]

In a small saucepan, make a simple syrup by bringing the sugar and water to a boil over medium-high heat.  Simmer, stirring occasionally until the sugar dissolves and the liquid thickens [about 5 minutes].  Cool for about 20 minutes.  I usually do this ahead of time and store it in the fridge.

Blend the simple syrup ice, yogurt, raspberries, apple juice, vanilla, and ice  until smooth.  I also like to add a little more raspberries to the mix because we like our smoothies on the thick side.  Finish it off with a nice dollop of whip cream.

It is as simple as that!  You can essentially use any mixture of frozen fruit and if you use fresh fruit just add more ice.  It cheers me up every time!  And for your convenience, here is the printer friendly version:

Powered by Blogger.
Theme Designed By Hello Manhattan
|

Your copyright

Your own copyright