Slider

Matching Felt Shapes

Monday, July 30, 2012

Awhile ago I pinned this super awesome felt Christmas tree for Cindy and started thinking about different felt projects.  I of course will do the tree and then I thought about creating a felt board to do Bible stories, felt faces, felt food,.... oh the possibilities!  I started small and did felt shapes for her learning wall.  Please excuse my inability to cut evenly. 

It took a few mintues to cut and another minute to staple it to the wall.  Yup, in less than an hour we had a fun and interactive way for her to learn her shapes.

Now she can match the shapes and I try to talk about how many sides each one has and what objects are that shape.  That lasts about 30 seconds with her attention span, but I try.  The teacher in me can't help myself and I have pretty much turned her play room into a mini classroom.  All it took was some paper and she has a learning wall that is still a work in progress...

Paper is cheap, felt is cheap so get creative.  The color poms are super easy to make, I have a tutorial for poms here.  So for now that is all the felt I have but  I can pretty much gaurantee you will be seeing more felt fun in the next few months. 

Our First Quilt

Sunday, July 29, 2012

It's a first for the both of us. The first quilt I have ever tried to sew and the first she has owned. I started this project about two months ago and it has been an interesting journey.  I am sure I felt every emotion possible in the process.

It began with good intentions.  The quilt I envisioned was perfect in every way.  I did some research, studied some tutorials, and created the pattern.  In the end, it was not perfect by any means... I made some measuring mistakes along the way, had to unstitch and cut certain parts, second guessed my color choices, but I made it through.  This first of many quilts fell short of those good intentions but it is made with love.  When she uses her little quilt, I want her to remember that she is wrapped in my love.

When I think about the process it took me to finish this, I think about my journey as mom.  I am a mom full of good intentions and in the process, mistakes are made and things don't always turn out the way I envisioned them to be.  I look back and wish I could have done certain things better.... but, at the end of the day this precious little girl knows that I love her with all my heart and that is all that matters.

Recipe: Balsamic Bruchetta

Wednesday, July 25, 2012

I absolutely love bruchetta.  I enjoy all the fresh ingredients, especially the basil.  Oh I could smell fresh basil all day.  This week's dinner menu included spaghetti in which case I would usually serve cheese bread.  BUT I mixed it up a bit and served some yummy balsamic bruchetta instead.  It made the heavy dinner just a little bit lighter and a little more healthy.  Doesn't that mix of fresh ingredients look so tasty?!
So here is the super easy recipe serves 8:

8 Roma tomatos diced
1/3 cup chopped fresh basil
1/4 cup of fresh grated Parmesan cheese
2 cloves of minced garlic
1 tbsp balsamic vinegar
1 tsp olive oil
1/4 tsp salt
1/4 tsp pepper
1 Baguette

Mix all the ingredients together.  Slice baguette, brush a little olive oil on the top and bottom, and toast it.

Place the tomato mixture on top and WALA a yummy, healthy, easy, fresh side to an Italian dinner.  It also makes for a beautiful appetizer.  And be sure not to place the tomatoe mixture on top until you serve it or else the bread will get soggy.


Stinky Stink Monday

Monday, July 23, 2012

It's been one of those days where the number of stinky stinks out number the good things that have happened throughout the day.  It's also Monday and that pretty much says it all.  It seemed the day was doomed to fail with me leaving my cell phone in the middle of the woods on the running trail... and it pretty much goes down hill from there.  But as the hubby says, that is life and sometimes those days happen.  I have been trying really hard today to look at the good things that happen instead of the bad because this is really not the way I want to start my week.... [hope you had a better Monday than I did].

So with that said, here are some photos from the July Photo Challenge [which gives you small glimpse into our little lives].

July 16:  Sign 

July 17:  Addiction  I actually took this picture today [I know I am a cheater] but my current addiction is running.  I seriously use to hate it but we have somehow reconciled.  This little one loves it too.

July 18:  Plate  Here is what is on our plate.  One of our favorite lunches [an odd one too].  Eggs over easy with toasted Sweet Hawaiian bread.   Boo and I share it.

July 20:  Eyes  Okay so this wasn't taken the 20th but it is a great picture of the little one's eyes when she was just an itty bitty.

July 21:  9 o'clock  No better way to start the morning with a piece of my favorite Filipino chocolate [thanks big sissy].

Tutorial: How to Make a Tie Onsie

Friday, July 20, 2012

Okay so this is probably one of my last baby projects for awhile and it is so cute it makes me want a little man... sometime in the far far away future of course.  It is super easy to do and yet another great and personalized baby shower gift.

There are a few ways to make the shape of the tie and it really depends on preference.  I like the more box-y look but google search tie onsies and pick the one that floats your boat.  If you also like this look, feel free to download my pattern, which I used for 0-3 month onsies.  You can get the image from HERE on flicker, download the large size and print.  You can also download the PDF version from HERE on scribd.
Once you have your pattern, cut it out and set it aside.  We are first going to turn the tie into an iron on.  You will need three pieces; fabric, fusible web [which fuses two pieces of fabric together], and lightweight interfacing.  The interfacing helps to make the thin fabric a little more sturdy and makes it easier to sew onto the shirt.  Lay the pieces in order one on top of the other and iron it together.

Then, pin the pattern onto the now one piece of fabric and cut.  As you can see, the back is the lightweight interfacing.
Now cut more fusible web the shape of the tie and we are going to iron on the tie to the onsie.  Be sure to center it and tuck the bottom of the tie under the top.  Ironing it on will help keep it in one place when you sew.
Now for the fun.  Sew around the entire thing and in between the top knot and tie.
Once you are done it should look like this.  I got a little crazy and used a fun stitch I never get to use.
Before you know it, you will have some adorable little tie onsies for any little man in your life.

Tutorial: How to Cover a Wipes Case

Wednesday, July 18, 2012

I know there are tons of toots out there for this but I thought I would throw my two cents in since I was making these this week anways.  I included lots of pictures but this is a super duper easy DIY project and makes a great baby shower gift.  All you need is a traveling wipes case, some felt [or batting], fabric and ribbon. 

So lets get started.  Take a plain boring traveling wipes case and trace it on a regular sheet of white paper.  This will be your pattern.

Pin it to two pieces of batting or those 10 cent sheets of felt and cut.  Repeat this step with the fabric of your choice.  Be sure to cut the fabric pieces slightly larger on the sides to ensure it fits the case well.  You can always trim off the excess.

Use a hot glue gun to glue down the batting or felt piece on the the case just so it covers the top.

I have included detailed instructions on  how I glue the fabric on.  This most certainly is not the only way, it is just the way I have done it time and time again.  And, don't go crazy with the hot glue gun. 

1. I start from the back of the case.   I place a little dot, center the fabric and then glue down the fabric all along the back rim.  See how I have left a little breathing room.  You don't want to glue right on the edge because it could affect how the case opens.

2.  Pull tight, place a dot of glue on the front center end and glue that down.
3. I then glue the sides down being sure that the corners are glued well.  Be sure to pull on the fabric as tight as you can every time you glue it down.

4.  I finish it off in the front gluing the fabric down the front of the case pulling tight.  I usually end up trimming some excess too.

To cover all of those unruly raw edges we are going to use ribbon.  If I can't find ribbon to match I will sometimes use bias tape.  This ribbon is 3/8 of an inch thick.  I start in the back again and work my way all the way around.

And in a short amount of time, TADA an adorable, personalized, wipes case.  I kept this one simple [which is personally how I like them] but if you google image search wipes cases you can really get creative with these.  You can add ribbon to the front, flowers, applique, quilt the whole case, ruffles.... the possibilities are endless.

Building Confidence

Monday, July 16, 2012

Thanks to running I had enough confidence to pick up a power drill and build something.  Sounds a bit odd but in all seriousness, running has helped give me a confidence that I never had before.  It has been almost two months since I started my journey of getting fit for life.  If you haven't been following along, I have been setting mini monthly goals to get my mind motivated to exercise and my body moving.  The first month was a 10 minute work out video a week and this month it is running a mile a week.

Running has been a challenge and it has given me a confidence in my mind.  When I go out running I set little goals as to how far I want to run without stopping... pass the water thingy, to the bench, to the tunnel, the full mile.  Each benchmark I hit, broke that nagging I can't in my mind.  I realized that the reason why I can't reach that itty bitty achievable goal is because I said I can't.  Small as it may be, it feels like a huge accomplishment when my entire lower half burns, my breathing is out of sync, my lungs are screaming for a break but I keep on pushing until I reach that mini goal I set.

When it comes to putting things together, the hubby is always the one using the power drill because I have told myself I can't, I don't know how.  That pesky I can't has weaseled it's way into  another area of my life.  This week I said I can and I am going to build something.  I really wanted to make Cindy a book display, I had a plan in my mind and I set out to make it happen.  Through the process [just like the process of getting fit for life] I learned a lot.  Not only to use the drill and the saw but also how things get put together.

My first attempt was a bust.  It was small and wobbly.  Sort of like that first time I went out on the track.  I couldn't even run an entire lap.  But I set small goals that I know my body could reach, pushed myself and kept going.

And just like with running, I didn't stop with that small wobbly book display.  I used what I learned and built another one and though it isn't aesthetically beautiful, it is solid and gets the job done.
Running has given me a confidence that has permeated other areas of my life.  Don't let your dream or goal end with I can't. 

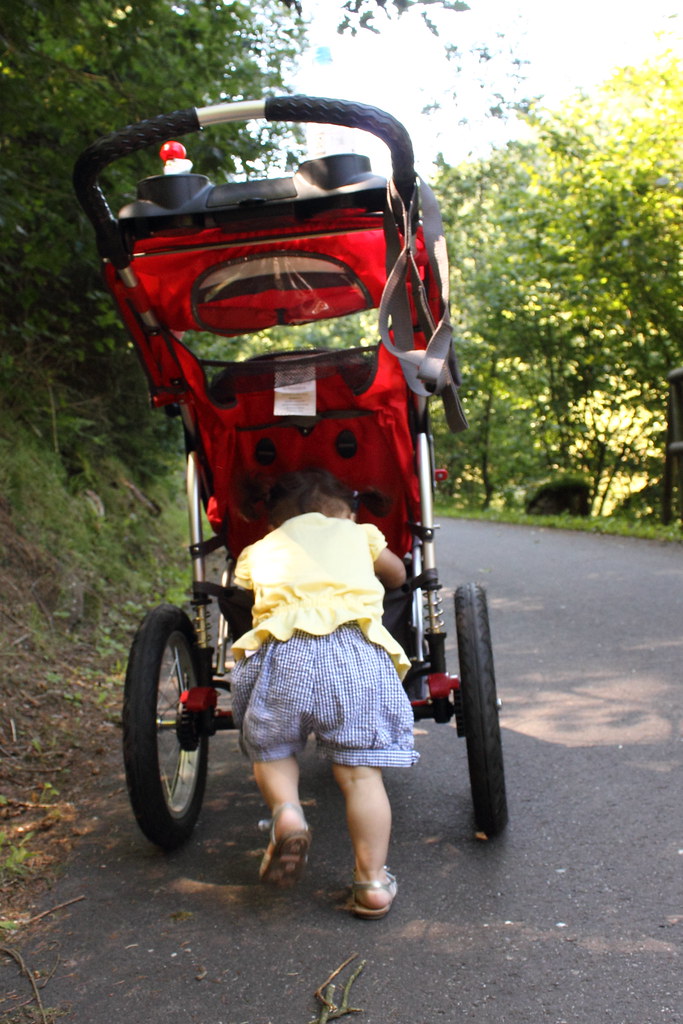
As for me, it doesn't end here though because I want excercise to be apart of my life.  So do want to join me?  This coming month, my goal is to not only run a full mile a week but to do it pushing my Boo Bear without stopping.

Watermelon Baby Bassinet

Sunday, July 15, 2012

It isn't Friday for Pin it and Do it Friday, but this is the pin that I did this week.  No better excuse to try those pins that have been building up than by making something for a party.  I was going to a baby shower this week and knew that this stinkin cutie watermelon bassinet was perfect. You can find the pin here.

It is super easy to put together and thank goodness because were running late and I was rushing.  I first cut a cantelope in half and began taking off the skin to make the baby face.  With some shaping I was able to get this half circle.

Cut a little hole for the pacifier and tiny ones for the eyes. You could use watermelon seeds for the eyes but I used chocolate chips.

I then created little balls from the melon. I don't have a melon baller yet so I used my metal measuring spoons and it worked just fine.

Now onto the watermelon.  Cut like so and start getting rid of the insides using a melon baller or a 1 tbsp metal measuring spoon.  There was another one of these at the shower and they created a design on the top rim and it was adorable.  Finish it by scraping the inside really well.

Then start filling it with the fruit and place the head inside. Before long you will have an adorable fruit display. The other one at the shower had wheels that were made using orange rings and grapes.  I loved it and you can see an example here. If you have time you can really creative and create and entire fun fruit display.

Tutorial: How to Sew a Ruffled Butt Onsie

Wednesday, July 11, 2012

Nothing is more adorable than a little girl with a ruffled bum.  I seriously love it!  And for those itty bitty newborns, it makes tummy time that much more adorable, don't you think? [If you are wondering how I got this orange onsie, it is dyed and you can find that tutorial here. ]  Now lets get started on making this ruffled cutie. 
You start with strips of fabric [fold your fabric over a few times and cut].  The thicker the strip, the larger the ruffle.  You want each strip a little over twice the length of the onsie. 
Set your machine to create a zig zag stitch to prevent fraying when washed.  For mine, I set the length to 1 and the width to 5.  Zig zag all the way around.
 Once the edges are sealed with the zig zag stitch, find the center of strip and mark with a pin.  Then sew one regular long stitch [without back stitching] to the halfway point.  Then again from the halfway point to the other end.  [You can see my stitch in the second picture where the arrows are pointing].  Pin the center of the strip to the center of the onsie. 
To start ruffling, you will pull on one of the threads on the end.  Ruffle to the center and pin it.  You will repeat the process on the other end.
Once the entire thing is pinned, tuck the ends of each side under. 
Sew as close to the top edge as possible and repeat the proceess for the second and third ruffle.  Ruffle number two will go right under the first ruffle and so on. 
Now I didn't want to leave the front plain and boring so I monogrammed it with a ruffled letter.  I know, I know I am ruffle mad.  But you gotta admit it looks pretty darn cute!
And there you have it, a ruffle in the front and a ruffle in the back.

Baby Steps

Monday, July 9, 2012

Last week I shared some quotes and reviewed The Total Money Makeover.  I mentioned I would go through the baby steps, but before that I wanted to share a success story.  Throughout the book, Dave shares these stories of people from different walks of life who have successfully gotten out of debt as a way to motivate.  Here is one of my favorites:
I think I like this story because I can sort of relate to it.  When I see something I want [which is a lot of things] it consumes me until I get it.  I can't WAIT and I just have to have it.  The concepts of this book have taught me to wait on those wants.  The baby steps changed my attitude and taught me discipline.  Like this family I know it has helped our communcation especially when it comes to finances. 
So, are you motivated?  The baby steps are simple, but it takes dedication and discipline to follow through, especially with the debt.  Here are the baby steps:

1. Save $1,000 to start an Emergency Fund
2. Pay off all the debt using the Debt Snowball
3. Finish the emergency fund saving $3,000-$10,000
4. Invest 15% of household income to Roth IRA's and retirement
5. Save for the kiddos college
6. Pay off home early
7. Build wealth, have fun, and give! 

You can find a more detailed review of these steps at here at Frugaldad.com and a slight alternative to the plan. 

I know money talk is a taboo issue but like I said in my post last week, I want to share this book because I am so thankful someone shared it with me.  Even if it helps one person who read this to get financially fit, it was worth sharing.
 
Powered by Blogger.
Theme Designed By Hello Manhattan
|

Your copyright

Your own copyright